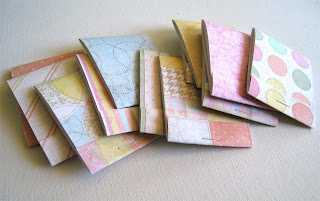
I'm no good at tutorials, but maybe I should practice. I made a bunch of little notebooks that were so fun and so easy to make. They turned out so darn cute, I though maybe YOU would want to try!
So here's a little tutorial:
the matchbook notebook
supplies you will need:
cute cardstock, scratch paper, ruler, exacto knife or scissors, bone folder, stapler, pen
Use scratch paper to decide size and play around with the folding. Be sure to leave room for the flap to tuck into the bottom fold after it's stapled. When you get the size you like and the folds right, mark them with a pen as this will be your guide.
Now lay your cute cardstock on top of your guide paper, lined up like so. Then use the ruler and bone folder to score the folds into the cardstock.
Now fold on your score lines and cut some insert paper (I use scrap paper or printer paper). Cut the insert paper just smaller than the middle folded section of your cardstock. Also, don't try to pile too much paper in as you will need to get the stapler through it all.
Now tuck your insert paper in that small fold and staple close to the fold, but make sure you are still getting all the paper in there.
Now just tuck the top fold under the flap and..
VOILA!!
A cute little matchbook notebook!
I've made lots of these and they are super fun for gifts or party favors or a fun craft for kids.
If you don't feel like making one yourself, I've got some for sale in the Pantry shop!
Yay for fun crafts!
.jpg)


.jpg)


.jpg)


.jpg)


Okay, I know I have said this before, but YOU ARE SO CRAFTY!!! I don't know how you think of all of these cute things??? Thanks for the tutorial it looks pretty easy to make, but I don't know??? My non-craftiness can mess up anything!!!
ReplyDeletereally cute! I've made something similar for my kiddos and they just love having a place to compile all of their drawings and whatnot for whatever they are doing that day.
ReplyDelete:)
a
Okay, I have no idea how I found you but super glad I did! These are DARLING!
ReplyDelete